Thursday, October 18, 2012

Tutorial: How to Make Commercial Rapunzel Hair Fit

So, your little girl is going as Tangled's Rapunzel for Halloween and you bought the hairpiece from Disney.  It's not made to be adjustable, so if your child has a head that isn't 18 inches in circumference, you're SOL, right?  Nope.  If your little girl has a head smaller than that, cut a bra strap off an old bra, including the little plastic jump ring, and whip stitch both the ring and the other side to the back of the crown.  Voila!  Adjustable headpiece. (I would, however, fray check the raw edge and turn it under first.)

If, like Grace, her head is bigger than 18 inches, it's a bit more involved. You'll need hot glue, a needle and thread, 1/4" pink grosgrain ribbon, a lighter, and 1/8" pink ribbon.  You might need an extra flower, too.

 Examine your headpiece.  The plastic band has two little tabs that when pressed in will take it apart.  The only problem is that the hair is glued to it.  Lucky for us, it's hot glue.  (Disney, I expected better than that!)  Gently pull off the flower, the hanging braid, and then several inches of the end of the braid crown on one side.  I chose the right. 


While you're removing things, You'll need to cut the ribbons and gently peel off the combs.  Be careful not to break them, because we're going to reuse them later. Also be careful not to cut the ribbon wrapping the plastic band or the hair.

Now, measure your child's head, and subtract 18" from it.  Add two inches to that and heat seal the ends by running them over the lit lighter. Fold under the raw edge, glue in place, and then whip stitch it for extra security.  You'll need to measure, keep measuring, and fiddle with the other side until it measures correctly.  Glue and stitch in place, and then try it on your child's head.

Now, we're going to reinforce it, because the braid is too heavy to hang from just one piece of ribbon.  So repeat the process on the other side of the braid, and then glue the two ribbons together.  Glue the braid in the center of the space (across from the pink center flower of the crown).  Now, cut a loooong piece of ribbon, tie and stitch around one end, and wrap the whole shebang.  You'll want to do criss-crosses on the braid to reinforce it.  Try to have enough ribbon to do two layers.  Glue and stitch the end.  Be sure to heat seal them so the ribbon so it doesn't come unraveled.   Position your flower.

If the ends of the braid crown are showing, you'll need an extra flower.  Glue in place, and with small stitches sew the wrappings to each other so they won't come unwound.  Now, if you want this stiffer, you could use a scrap of heavy-duty pellon interfacing on the back.  But I found that the ribbon is sufficient, and it helps shape it to Gracie's head.

 Now, let's talk about attachment.  The combs were oddly placed.  So I didn't put them where they'd been--I put them on the sides and glued them in place... at first.

The thing is, as I just proved, hot glue isn't the most permanent thing in the world.  It's fairly easy to pull it apart and even remove it.  So while the glue will hold it for a bit, it won't keep it there through everything, so you need the needle and thread again!  You'd have to pull off more hair to redo it the way it came, so a needle and thread are the way to go--especially since they wrapped the plastic band in ribbon.


I used between the combs and in that negative space inside the comb itself to secure it.  And I placed it right in the middle of the sides.  You can just call it good here and be done.

But if your little girl is anything like Gracie, this next step will insure that it stays on her head.  Cut 1/2 inch pieces--I did 10--of the 1/8 inch ribbon and seal the ends.  Put the sealed ends together and whip stitch them.


Take that, and whip stitch it to the inside of the band.  Repeat at regular intervals.  This gives you little loops to slip hair pins through to pin it to your child's real hair.

We're doing double twists that end in a low bun under the braid and securing it that way so 1) it won't fall off and 2) she can't just pull it off.  We've made it clear that she'll need to see her teachers for help to get it off if she needs to.


Disney didn't bother to seal the ends of the ribbon that's braided into the hairpiece, so even if you don't have to adjust it, you ought to heat seal that.  (It's funny, nobody smokes here, but I have several lighters just to heat seal ribbons!)


And now you have what Gracie terms to be the "beautiflulest" Rapunzel hair that actually fits and works!
And here is our little Rapunzel at preschool....
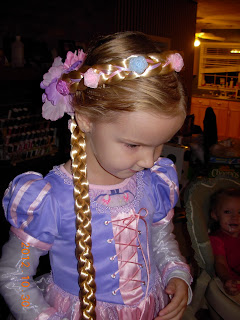
And getting her hair fixed. I did it in twists on the sides of her head and ended it in a bun before pinning in the hairpiece. The dress is one you might recognize from May if y'all read this blog--I made it as a birthday present for Grace from Simplicity 2065.


Monday, October 15, 2012

Rapunzel hair, take 2


This is the Rapunzel hair that I ordered from the Disney Store.  I wish the flower really looked like that!  (It's limper and folded in on itself... but I think I can fix that.)  From the reviews, I knew the chances of having it fit Gracie were about nil.  It's made to fit an average size head, and everyone in the family tends towards big noggins.  Grace isn't an exception--she has a 21 inch head!  Turns out that it's meant for an 18 inch head, and I'll know more tomorrow if what I did worked after she tries it on again.  And that won't be until after school.  If it did, I'm planning a tutorial!  I figure I can't be the only person out there to buy a Disney braid crown only to have it be too small, and the fix is both simple and inexpensive.

I'm also working from a back up keyboard right now because Nicole, who shall hereafter be known as Imp, dumped juice in my keyboard causing half the letters to malfunction.  I bought a new one just like my old one but it probably won't be here until next week.  I prefer the one I had because I'm used to it, and the keys light up so that they're easy to see!

Sunday, October 14, 2012

KCWC--Day 7, last day!

And I did next to nothing.  Sewing on Sunday never works out for me, so I try to avoid it.  If I do it, it takes twice as long, I tend to ruin projects, and the results tend to look.... bad.  I did break out the iron and fuse the interfacing, though.  Nikki isn't quite old enough to understand that the iron is hot, so I do my best to avoid ironing when she's here.  So I spent my hour ironing instead of sewing.  Tomorrow, well, that's a different story.

I hope my materials show up to finish the Psycho Billy Cadillac Christmas dresses.  Don't you hate it when you thought you had something and it turned out not to be true?  That's why I had to order more stuff--my entredeux is UA.  So that was my day.  :) No church 'cause it's Stake Conference this weekend.  That's five or six congregations in the area getting together for a meeting. 

I'm going to try and sew the shirts together tomorrow.  And then I'll move on to crinolines, since I plan on more vintage dresses for them.  Gracie grew again, so I should probably do some remeasuring.  She's about three inches taller than the last time I measured her.  The Rapunzel hair should be here tomorrow, and from the reviews, I'm going to have to adjust it.

Saturday, October 13, 2012

KCWC--Day 6


I wanted to get some sewing done, but after my SIL went to work, my brother showed up and we played with the girls instead.  But I did spend an hour and a half getting two white shirts cut out and the elastic for Nikki's Sunday diaper cover situated.  No, it's not sewn in yet, but I cut another two inches to add to it and trimmed off the ends of stitched, slightly mangled elastic ends.

Diaper covers are the second most boring thing I make.  But they're a wardrobe staple for babies and not easy to come by commercially.  With what fabric I tend to use, they're also cheap if I make them.  I almost always make a matching one for any baby girl clothes, and a handful of white ones to go with everything else.  And as for the white shirts, well... I scored some Strasburg jumpers for the girls that were missing the shirts that originally came with them, and if we put the shirt underneath, it stretches their sundresses for another month or two and gives me the space to whip out some winter dresses!

Friday, October 12, 2012

KCWC--Day 5


Sorry for the dark pic.  All I was getting was either too dark or too light.  Today, I adjusted patterns again to make white blouses for the girls to put under sundresses.  Sundress weather is just about over, so unlike a lot of clothes I make them, this is entirely practical!  I mean, they can go with jeans, too, or just about anything because they're plain white blouses.

I also ripped out stitching in Nikki's Sunday diaper cover so I can add more elastic to the legs.  I don't know what I did when I made that this time last year, but they're still blousy and a bit big... except for the legs.  Tomorrow, I'm going to try and get some actual sewing done!

Thursday, October 11, 2012

KCWC--Day 4

I've spent several hours today adjusting patterns.  Now the waistlines of the pinafores should fall in the same place as the waistlines on the dresses.  I also spent two more hours locating the lace the pinafore will be trimmed with and attempting to find the entredeux that is supposed to run up the bodice around the shoulder ruffles and around the skirt.  Couldn't find it, so I ordered more... which will set me back and make it so this won't be completed this week.  I'll do all I can, and then move on to the crinolines.  Grace needs the next size up, and Nicole outgrew hers a long time ago.  I didn't bother to make another for her because she hasn't had the full-skirted dresses that need one underneath!  But, well, this is a 50s base pattern and you need one to get the necessary fluff.  I've learned a few things since last year, like the fact that I should line the whole thing to prevent "ticklies" as well as "itchies"!

Wednesday, October 10, 2012

KCWC--Day 3

I didn't quite get as far as I wanted, but it was my older brother's birthday, and I had to bake a cake--

And make cheeseburgers.  So instead of finishing the dresses and starting on the pinafores, I just managed to get from where I was yesterday, remember?


Yep.  Collar, fancy stitching, lace sewn on, basic bodice assembly done.  Today, I attached the cuffs (lots of handsewing there!), the skirt, had to fix an oops, sewed on more lace, hemmed it, and generally did all the finishing work.  So we went from what's on the left to this--


 For all that this is the Psycho Billy Christmas dress, I think I'm getting more classic and timeless.  But doing it this way was the only way I could get what I want. 

As for the oopsie, well, I got to the hem and measured the dresses, only to find that I'd made Grace's three inches too short, and Nicole's was five inches too short!  I didn't have enough fabric to redo the skirts, so I added a band to the bottom and then sewed lace over the join. 


I'd intended on topstitching the hem and hiding that with the lace, so it just required the slight adjustment of hand hemming them--which isn't always the easiest thing to do with CRIN!

I know these could use sashes, but since I'm doing a pinafore, it would make tying them awkward.  As many eras as these are, this will be Nicole's first vintagey-modern dress!