So, your little girl is going as Tangled's Rapunzel for Halloween and you bought the hairpiece from Disney. It's not made to be adjustable, so if your child has a head that isn't 18 inches in circumference, you're SOL, right? Nope. If your little girl has a head smaller than that, cut a bra strap off an old bra, including the little plastic jump ring, and whip stitch both the ring and the other side to the back of the crown. Voila! Adjustable headpiece. (I would, however, fray check the raw edge and turn it under first.)
If, like Grace, her head is bigger than 18 inches, it's a bit more involved. You'll need hot glue, a needle and thread, 1/4" pink grosgrain ribbon, a lighter, and 1/8" pink ribbon. You might need an extra flower, too.
Examine your headpiece. The plastic band has two little tabs that when pressed in will take it apart. The only problem is that the hair is glued to it. Lucky for us, it's hot glue. (Disney, I expected better than that!) Gently pull off the flower, the hanging braid, and then several inches of the end of the braid crown on one side. I chose the right.
While you're removing things, You'll need to cut the ribbons and gently peel off the combs. Be careful not to break them, because we're going to reuse them later. Also be careful not to cut the ribbon wrapping the plastic band or the hair.
Now, measure your child's head, and subtract 18" from it. Add two inches to that and heat seal the ends by running them over the lit lighter. Fold under the raw edge, glue in place, and then whip stitch it for extra security. You'll need to measure, keep measuring, and fiddle with the other side until it measures correctly. Glue and stitch in place, and then try it on your child's head.
Now, we're going to reinforce it, because the braid is too heavy to hang from just one piece of ribbon. So repeat the process on the other side of the braid, and then glue the two ribbons together. Glue the braid in the center of the space (across from the pink center flower of the crown). Now, cut a loooong piece of ribbon, tie and stitch around one end, and wrap the whole shebang. You'll want to do criss-crosses on the braid to reinforce it. Try to have enough ribbon to do two layers. Glue and stitch the end. Be sure to heat seal them so the ribbon so it doesn't come unraveled. Position your flower.
If the ends of the braid crown are showing, you'll need an extra flower. Glue in place, and with small stitches sew the wrappings to each other so they won't come unwound. Now, if you want this stiffer, you could use a scrap of heavy-duty pellon interfacing on the back. But I found that the ribbon is sufficient, and it helps shape it to Gracie's head.
Now, let's talk about attachment. The combs were oddly placed. So I didn't put them where they'd been--I put them on the sides and glued them in place... at first.
The thing is, as I just proved, hot glue isn't the most permanent thing in the world. It's fairly easy to pull it apart and even remove it. So while the glue will hold it for a bit, it won't keep it there through everything, so you need the needle and thread again! You'd have to pull off more hair to redo it the way it came, so a needle and thread are the way to go--especially since they wrapped the plastic band in ribbon.
I used between the combs and in that negative space inside the comb itself to secure it. And I placed it right in the middle of the sides. You
can just call it good here and be done.
But if your little girl is anything like Gracie, this next step will insure that it
stays on her head. Cut 1/2 inch pieces--I did 10--of the 1/8 inch ribbon and seal the ends. Put the sealed ends together and whip stitch them.
Take that, and whip stitch it to the inside of the band. Repeat at regular intervals. This gives you little loops to slip hair pins through to pin it to your child's real hair.
We're doing double twists that end in a low bun under the braid and securing it that way so 1) it won't fall off and 2) she can't just pull it off. We've made it clear that she'll need to see her teachers for help to get it off if she needs to.
Disney didn't bother to seal the ends of the ribbon that's braided into the hairpiece, so even if you
don't have to adjust it, you ought to heat seal that. (It's funny, nobody smokes here, but I have several lighters just to heat seal ribbons!)
And now you have what Gracie terms to be the "beautiflulest" Rapunzel hair that actually fits and works!

And here is our little Rapunzel at preschool....
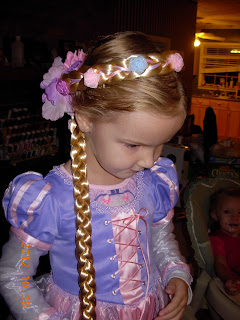
And getting her hair fixed. I did it in twists on the sides of her head and ended it in a bun before pinning in the hairpiece. The dress is one you might recognize from
May if y'all read this blog--I made it as a birthday present for Grace from
Simplicity 2065.


 And here is our little Rapunzel at preschool....
 And getting her hair fixed. I did it in twists on the sides of her head and ended it in a bun before pinning in the hairpiece. The dress is one you might recognize from May if y'all read this blog--I made it as a birthday present for Grace from Simplicity 2065.
No comments:
Post a Comment