Showing posts with label tutorials. Show all posts

Monday, August 13, 2012

Tutorial: chemically set pleats

Some may have noticed that I've been doing lots of pleated things lately.  It started with the first skirt for Skirting the Issue, and then while I was at it, I made Grace's first day of school dress and I just finished Nicole's latest outfit.  While it's not--exactly--possible to have no maintenance pleats with natural fibers, it is possible to make them easy to reset after washing.  Most commercially pleated garments--those with permanent pleats that don't require maintenance--are made from polyesters and other artificial materials.  Cotton, linen, and rayon are fairly easy to set pleats into, but they will require the pleats being "reset" when you iron them before wearing.  However, if you simply iron the pleats after washing, the pleat lines will be gone and make it very hard to reset them correctly.

I know of two methods of setting in the pleats.  1)There is a commercially available product.  I'm told it's a special chemically-treated press cloth.  2)Use what's in your kitchen!  Bear with me, and I'll explain. 

I always use #2 because, well, I'm cheap.  Why should I go and spend money when I have the equivalent in my kitchen cupboards?  Okay, your first step is to mark the pleat lines, fold the fabric into pleats, and pin it.  One hint--this is a lot easier if your fabric has a regular pattern, like stripes and dots--you have straight lines already practically in front of you, making it easy to get your pleats straight.


Next, start basting.  I prefer doing this by hand, as it's both easier to pull out, and less likely to leave marks on the fabric.  Once you've basted the front, turn the fabric over.

Baste the back.  This will keep your pleat lines from slipping as we press them.  Remember, our goal here is clean, crisp pleat lines. 


Here we are with it all basted.  The next step requires what's in your kitchen cupboards. 

Mix 1 cup of white vinegar with 2 cups of plain tap water and soak a press cloth in it.  I use a cloth napkin.

Wring out the press cloth until it's not drippy.

Lay the cloth over your first pleat and press it--don't move the iron.  Steam should rise from it.  When the cloth is barely damp, remove it, and put it back in your vinegar/water solution. 


Iron the pleat dry.  Now, repeat the process on the rest of the pleats.  Finish sewing the garment, leaving the hem for the last.  Once you have it sewn together, remove the basting stitches and hem.  Now you're going to have to reset the pleats during the final ironing.  This will put the lines into the hem, and I count it as extra insurance. 

Simply lay the garment on your ironing board and lay the pleats in place before repeating.  You really only have to do this on the bottom, but as I said--it's insurance.  The pleat lines will now hold up without help through three-four washings, but since if you're like me, I have to iron cotton things to get the wrinkles out, you'll want to press your pleats after washing.  The vinegar part doesn't have to be redone.


Enjoy your garment!


Thursday, August 9, 2012

Totally Thrifted Thursday.

It's consignment season here in Georgia again. For those who don't know, about twice a year, preschools and consignment organizations hold sales where you can get new and gently used kids' clothes for a fraction of their retail prices. They usually run Thursday-Saturday, and it's standard for Saturday to be 1/2 price day. It's worth it, though to go the first day, because you can miss some fantastic deals otherwise. And if there's something you're specifically looking for, like coats, you have to go the first day, because that sort of thing disappears quickly. The best I ever found was a pair of jeans and six tops for Gracie for $1.50. Yeah, they're second hand, but so what? Wash 'em and they're good as new. You do have to be picky (which I am), but it's possible to get beautiful clothing that's barely worn this way. For the next few weeks, anyway, I'll be sharing my finds--preferably on Thursdays when I'm child-free!


This is a three piece set--a diaper cover, sleeveless dress, and a coat.  Great for church on Sunday, and it looks like it was hung in a closet and never actually worn.  Yay consignment!  If I went to Macy's, I'm pretty sure I could find something like this, but I'd sure pay more for it there than the $1 I paid for it at the consignment sale!  Can't make 'em for that!

The coat is actually collarless and  it's a four-button coat.  The collar we can see is from the dress:


Consignment sales are actually better for baby clothes than any other size, so in a way this wasn't a surprising find, though the price was!  This is 18-24 months, so it's a little big for Nikki right now, but hey, kiddos grow, and I just couldn't pass it up!

Now this isn't the only purchase I made today, but I figure to only share one at a time...

Saturday, June 30, 2012

Tutorial: adjustable waistbands

When Gracie got into toddler clothes, adjustable waistbands were something of a revelation.  I mean, I'd seen buttonhole elastic at Hancock Fabrics when I was a teenager and wondered why in the world would someone want something that already had holes in it!  I'd never really seen it used before, and had no idea what it was for.  And to be perfectly honest, I sewed things here and there and knew the basics and taught myself tricks along the way (I never owned a sewing book or even looked at one until I won one in 2009!), but I didn't really get serious about sewing until I had a problem--see, I was diagnosed with lymphedema and suddenly had three inches of bandaging on each leg to contend with and none of my pants would fit over it.  Suddenly, I had to make pants unless I wanted to go naked!  And then, a couple years later, my sister and my sister in law both got pregnant, so I had little kiddos coming to sew for and decided to try my hand at quilting and started making them clothes.  But I digress.  :)

When Gracie got her first pair of pants with an adjustable waistband I spent a lot of time examining them to figure out how they were put together.  After all, if I could figure out how it was done, then I could replicate it in homemade clothing and even convert regular waistbands that were too big without too much effort.  If you're dealing with RTW clothing, you'll need to rip out the topstitching holding the bottom of the back middle belt loop to the waistband, and rip out one to one and a half inches of waistband on either side of the side seams.


 Okay, so we've got out pants cut out.  The first thing we need to do is sew together the backs.  Measure the entire back side and then cut the elastic three buttonholes bigger.  This enables you to finish the raw edges of the elastic.  I burn it with a lighter to seal it, and then do a rolled hem just so that it looks nicer.  (I keep lighters around just to seal ends of elastic and ribbon.)


Next, it's time to break out the iron.  Iron down the waistband and the seam allowance, and fuse a 2.5" piece of interfacing to either side.  This stabilizes the weave and prevents puckering of the buttonholes.


For RTW, simply fuse the interfacing and open the waistband for marking.


Next, measure the elastic, not the buttons (I almost made this mistake!) and mark the fabric. Make sure that it's right outside the seam allowance. This is for both you-made (I hate the term home sewn.  ;) It brings to mind home ec classes and it's often almost used as an insult!)  Make the buttonhole, and well, my next step is to always fray check the buttonholes before I open it.  I was even more thorough on this particular pair of pants because the bottomweight I bought for it online turned out to have a looser weave than I was expecting.  Cut open the buttonholes before you do anything else.


For you-made, the next step is to sew the pants as normal.  For RTW, sew up the waistband, but don't mess with the belt loop you ripped the stitches out of.  After you have a complete waistband, slip a safety pin through the buttonhole and thread the elastic through one buttonhole, the back waistband, and out the other.


This is what it should look like.  Now, the next step is to sew buttons right over the side seams on the front side of the pants.


Put the knot on the inside of the waistband so that all you have is neat stitching on the outside. 


Button the elastic and stretch out the middle and pin it.  Sew over it three or four times to lock the elastic into the waistband.  Pin the belt loop in place and top stitch it in place.


Now the waistband of your new (or old) pants is adjustable!


If it's an old pair of RTW pants that already has an elastic waistband, I'm afraid this can't be done without ripping out the old elastic, but it will work on just about any pair of jeans that didn't come with one--even adult sizes!  (Perfect solution if you're in-between sizes)


And here's the result--pants with a waistband that can be tightened or loosened according to need.

Saturday, January 21, 2012

Tutorial: Transforming bloomers into functional panties


If your three-year-old is anything like mine, sooner or later, if she's wearing a dress, everybody will get to see the Care Bears panties she wore that day.  So even though she's potty trained, I tend to still make either fancy knickers to go underneath, or matching ones.  Examine the difference between the patterns and the RTW variety, and the main difference is that RTW panties have a double layer gusset between the legs. 

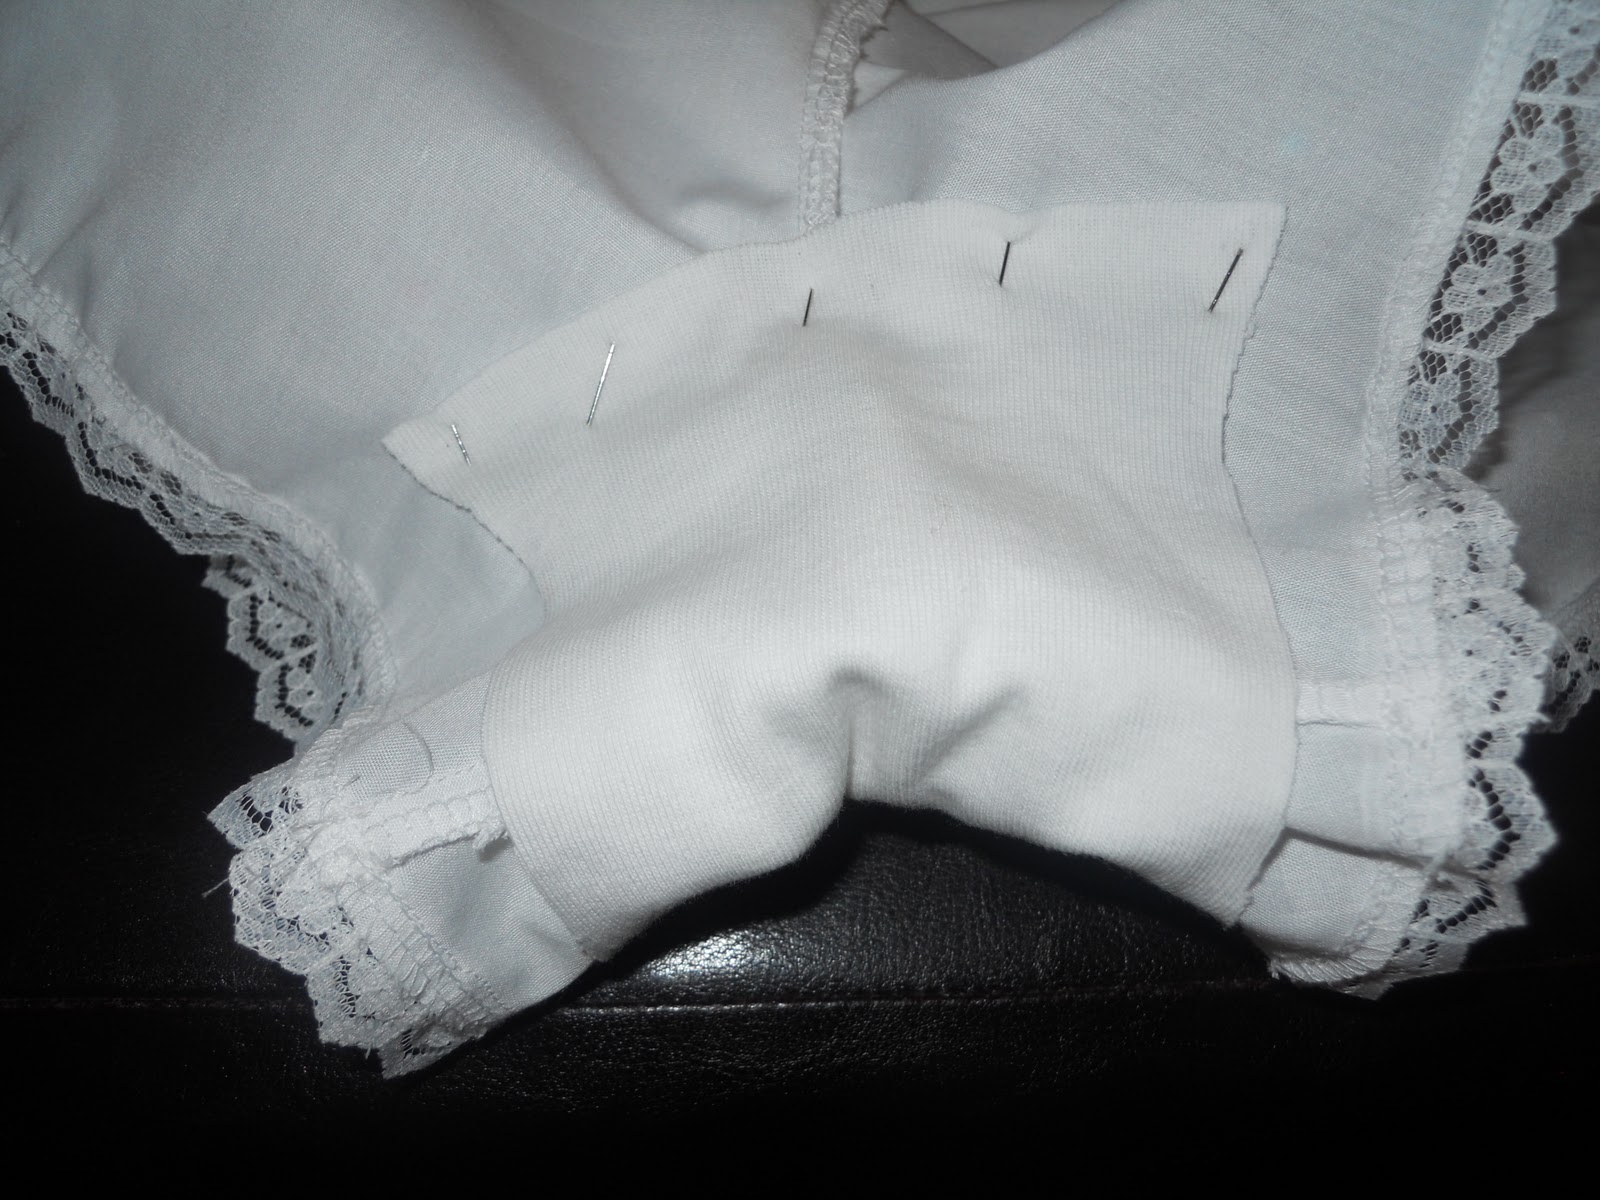
So if you sew in a knit gusset to keep sensitive areas away from seams, they become functional panties.  My first move was to trace the shape of the RTW gusset.  I did make it a bit wider, because, after all, these are poofy blomers!  Next, I assembled the panties in question, except for the leg elastic. 


My original thought was to sew the crotch seam first and not the side seams, but a bit of fiddling proved to me that for this pair, at least, that wouldn't work.


I cut the gusset from a scrap of knit, and it ended up
looking like this:

After a little cussing at it, I got it centered over the center seam of the panties, and pinned down.  On the right side of the panties, I took my #4 double needle and stitched down on the needle line, locking the raw edges of the knit in place.


After it's sewn down, all that's left to do is add the casings and the elastic. 


If you look closely, you can see the double line of stitching that holds the gusset in place.  Honestly,  I think this might've been easier with, say, Vogue 8060!

Tuesday, January 17, 2012

Sewing Terms: Continuous Lap

Continuous lap is a sewing term that isn't really seen much in modern patterns; it's seen more in heirloom sewing and vintage sewing.  Really, all it is is a way of binding off raw edges in a placket when it doesn't fall on a seam.  I hate it.  Truthfully, I've redrafted pattern pieces to include a seam in the right place just to avoid continuous lap! 

The original instructions I found last year had you pinning bias tape along the slash in the fabric in a straight line and then sewing it down.  I've since found some that take in account the fact that a slash is, essentially a "V", and avoids the slight gathering that happens with the way I've done it here.

This is the puckering that results from my original instructions.  After you've sewn the bias tape on one side, fold it over the raw edge, pin it, and sew that down.
Now your placket won't fray.  After this is sewn, foldthe placket back into position and decide which side will be the top.  Fold the bias tape under on that side, topstitch it, and then sew diagonally across the bottom like this "/".  That will secure your continuous lap as the bottom part of the placket.


The end result will look something like this--

It's now ready to attach to the bodice or cuffs of your garment.

Monday, January 16, 2012

Brilliant Basics: Darts

I've heard quite a bit about imperfect darts--how they're puckery and sometimes nippley.  But honestly, darts aren't that hard.  And I had quite a few in my 1950s toddler slip.  Part of that was my decision to line the slip instead of mess with bias tape because even with the darts, it's easier.  I had eight darts to take care of on a slip for a three year old! Darts are, essentially, a way to shape fabric so that it fits closer to the body.  In the case of my project, I really think it's more for show than anything.  Darts are also one of the few things that I insist on ironing before sewing anything else.  I find that you can skip a lot of ironing that sewing manuals say you need (my grandmother was a professional seamstress and rarely ironed anything!).

So you've transferred your marks, and pinned the darts.  The next step is to sew 'em.  I've done it from both directions, and to be absolutely truthful, the results look better if you start from the fatter side of the dart.  ;) But I had two little girls who wanted Aunt Laura to pay attention right then and none of the other four adults that were here would do!

 Be sure to leave long tails of thread on both sides, because you'll need them for the next step.


Once the darts are sewn in, the next step is to tie and clip the thread tails.  I usually go with a square knot, but a surgeons knot works exceptionally well.

After this, you have to iron it.  This will smooth out your seams, and can even help correct the tops of your darts a little if you've messed it up a bit.

 The ironing is really the last step.  I mean, you have to watch when you're sewing to keep everything where you've ironed it, but otherwise, you can move on in constructing your garment.


And after sewing up the rest of the slip, here's the result--a full skirted 1950s slip to go under Bit's dresses! (The 50s half slip, the crinoline slip, and the does-this-make-my-butt-look-big panties are under it in this picture, too.  Evie calls it her "ballerina dress".)

Tuesday, January 10, 2012

A "Duh" Moment

If you're like me, you have moments in sewing when you get an epiphany and smack yourself upside the head because you just discovered something so obvious that you wonder why it took you so long to see it clearly.  This one was a couple years back when working on Simplicity 2629.  See, it's a vintage reprint of a 1948 layette pattern.  And it has embroidery.  Lots of embroidery.  So I got a ink transfer pen and transferred the embroidery pattern.  And then it came time for the knife pleats.  Until then, no matter how hard I tried with tucks and pleats, out of a set of ten one would end up crooked.  It drove me nuts!  So here I am, having just heat transferred the embroidery design, staring at the transfer pen when it hit me.  Transfer the dang marks!  After all, the pleat lines are clearly marked on the pattern, and it would even give me a line to sew on.

As time has passed, I learned that transfer paper is a better way to go, and that it also works for darting and any other sort of pattern marking that ends up being essential. (Ink bleeds through light colored fabric.  And it's permanent.  These wash out and come in different colors in the same package for different color fabric)


So today, after finishing Bit's pettiskirt (more on that and the crinoline slip tomorrow)  I cut out her slip and put that old "duh" moment to use and transferred the dart markings.

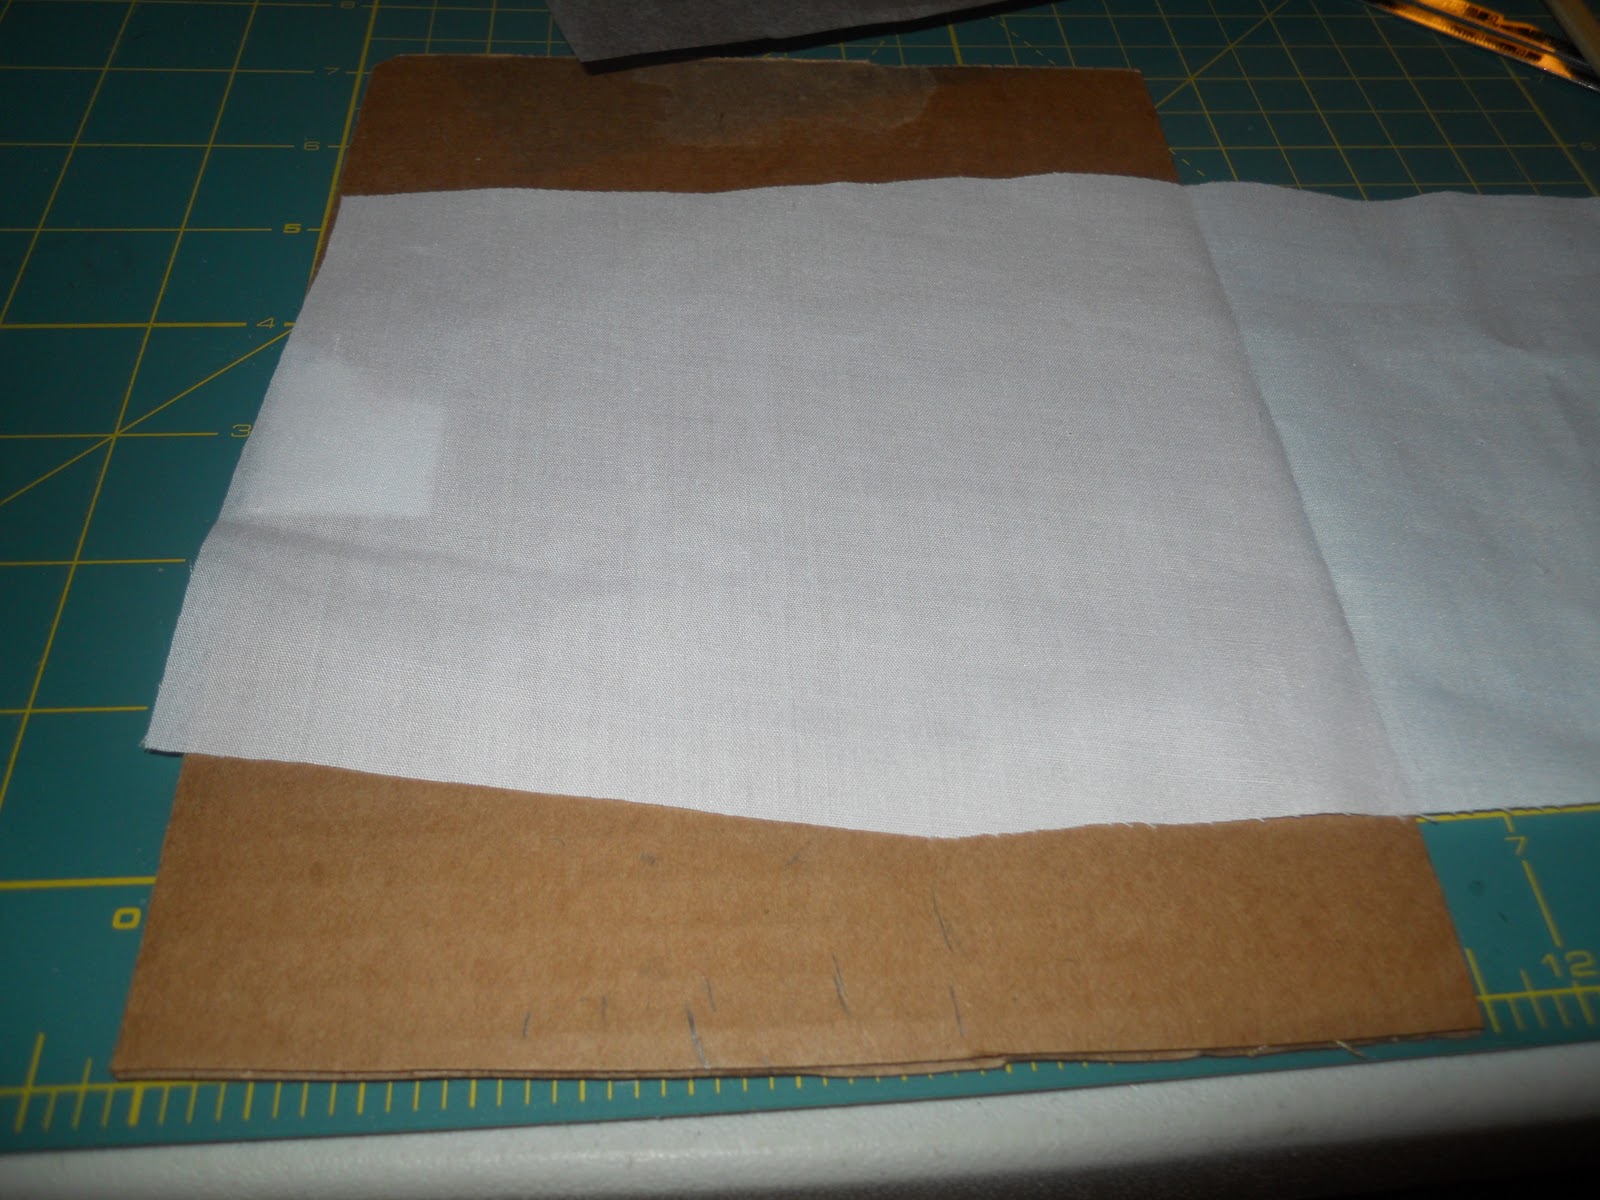
Okay, so here's the cut out pieces of both the slip and panties.  I also have a piece of cardboard for extra support (and to know where to line everything up to!) the transfer sheets, a mechanical pencil, a ruler, and a chopstick.


I purposely don't iron the front bodice of things until later, because it gives me a center line to work from, and this is no exception.  I lined that line up against the straight cardboard edge, and then lined the paper up against that.  The pattern piece goes on top of that, with the cardboard giving you a nice, straight edge to keep everything in the right place and straight.

The next step is to take the chopstick and mark over the dots.  When you could take the seam gauge (aka the only ruler I could locate because the others are packed) and go over the lines, you'll get clearer, more accurate lines if you wait.

Graphite washes out, so a common, everyday mechanical pencil is my marking tool of choice.  Line up the dots with the ruler and draw in your dart line.  Now, repeat with your other side and any other markings you care to transfer.


Now you have perfect markings.  Pin along them, follow the lines on them to sew the darts, pleats, or tucks, and you get perfect results every time.

I also transfer placement lines for things like ruffles on ruffle butt panties, and sometimes button hole markings, too!

And one more, a bonus "duh" moment.  For perfectly placed collars on back button pieces, also leave in the fold mark--at least temporarily.  Sew the shoulder seams together, sew and turn the collar pieces, and then bar tack them together.  Then place the bar tacked collar pieces on the center fold line and start pinning.  Sew it and you've got a perfectly placed collar!

Tuesday, July 26, 2011

Brilliant Basics: transferring pattern markings

In twenty years of sewing, I'd never transferred pattern markings.  I referred to them, yes, but actually transferring?  Nope.  In part, it was because the standard pattern tracing wheel has never worked for me.  I never could figure out how it was even supposed to work, and I tried repeatedly to get it to without success.  Two years ago, I was working on Simplicity 2629.   It's a vintage 1948 rerelease, complete with embroidery motifs. Thing is, the original pattern would have included transfers for the designs.  The modern version says something to the effect of, "transfer embroidery designs using your favorite method."  Most modern patterns that include embroidery say that.  Now, there are three common methods of doing it-- embroidery heat transfer pens, embroidery heat transfer pencils, and transfer sheets.  The marker is a favorite with opaque fabric because you get lines that are easy to see and thus, embroider over.

Looking at the transferred designs, I had an epiphany--why not transfer the tuck markings in the same way?  I'd always had problems with tucks before that--no matter how hard I tried, I always ended up with one being crooked.  And later on, I found that my pens stunk for transferring to white, semi-sheer, and sheer fabric because you could see the lines on the right side.  I tried the pencil, but I could never get it to transfer dark enough to see.  So I tried the sheets.  They're now a favorite.  I use them to transfer not only embroidery designs, but tuck marks, pleat marks, darts, and anything else that benefits from having a clear mark to work with.  Joanns in my area carries them, so you should be able to find them at your local craft store.

So, here's my guide for working with the transfer sheets.  First, we need to gather supplies.  I use a piece of cardboard for backing to make lining up the pattern pieces easier.  Once the transfer paper is laid on the fabric, it's hard to see where the fold lines are, so this gives a line to use.  I also use a seam gauge, though any ruler will do, a chopstick for the actual transferring, and a mechanical pencil for darkening the lines afterwards.


This is the transfer paper.  It comes in a pack with five different colors.  I prefer the graphite.  One thing you do need to know is that the marks from the paper won't stay--they lighten with a little handling (very little) and can disappear before you're done using them.  It washes out, and doesn't show through the other side.


The first thing you need is your cut out material.  I usually pin labels on any pieces that look similar and are close in size so I don't get them mixed up.


Now, lay the fabric wrong side out with the dart is facing you and  the fold line on the edge of the cardboard.   In this case, having the other side of the fabric on the outside is a great thing, because it gives you something to line up the pattern piece with.

Next, lay the transfer paper right side down on top of the fabric, and line the pattern piece up with the other half of the fabric.  (The chopstick is in the picture to keep the fan from blowing the pattern piece away!)

Now, using the chopstick, trace over the lines of the pattern.  A regular wooden number two pencil will also work in a pinch, but the chopstick is better because the end is flat.  Remove the pattern and the transfer paper and get out the ruler and mechanical pencil.  This won't show through to the other side, but it will provide you with both lines to match up and a line to sew on.

Now, line up the ruler and trace over the lines.  They're always a little crooked from transferring, and this straightens them out for you as well as making sure that they'll stay long enough for you to use them.


This is the result--a clear mark that shows where to sew.  Don't worry, graphite pencil lead does wash out.  Now, we need to repeat it with the other side of the fabric. 

You'll need to flip the pattern piece over and use the wrong side as a guide, but it'll still work very well.


Now this is the right side of the fabric.  See?  No markings!  Now, repeat with all of the markings you need to transfer.

Darts in kids' clothes are usually just for style and aren't really completely necessary for construction.  But if they're in your pattern, the pattern has been added to so that they become necessary. 

Transferring the markings eliminates the guesswork in making pleats, darts, and tucks.  While I wouldn't recommend it for tiny tucks, it works well for larger ones.  Sometime in the next week, I'll go over double needle pintucks; I'm using them in my current project!

And just for a cuteness break--

When I wasn't looking, Bit managed to curl up in her baby sister's car seat and fall asleep there today!